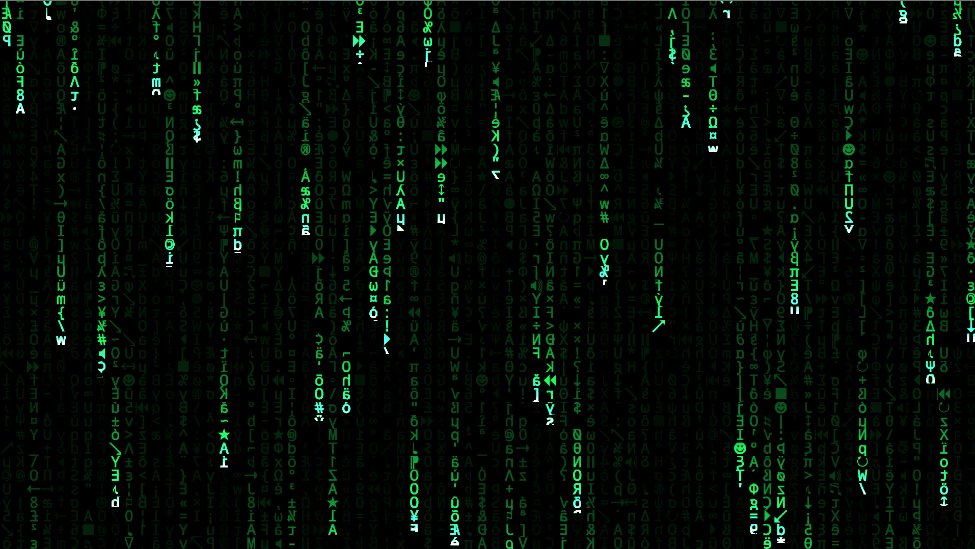
效果展示
黑客帝国的数字雨特效令印象深刻,网上已经有人在Unity中实现了类似的效果:

作者还有相应的博文介绍他的做法,大家可以去围观:
https://medium.com/@shahriyarshahrabi/shader-studies-matrix-effect-3d2ead3a84c5
本篇文章也会带你先睹为快。
如何做到演示效果
2D的效果
我们先实现一个小目标,在2D下实现如下的效果:
这个2D的效果主要由两部分组成,一是随机变化的文字,二是如同下雨一样的矩形列。
文字的随机变化
我们先来看如何实现随机变化的文字。
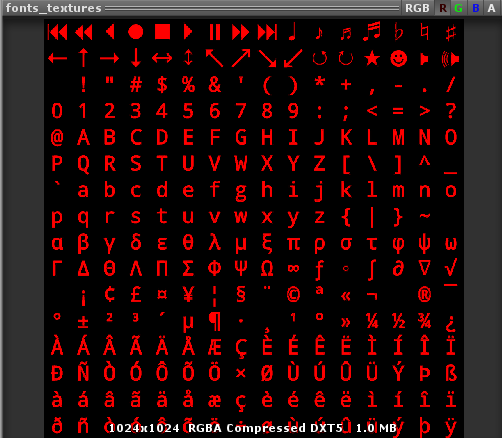
准备一张1024 x 1024大小的文字贴图,r通道包含了将要用于随机显示的16行 x 16列的文字信息:
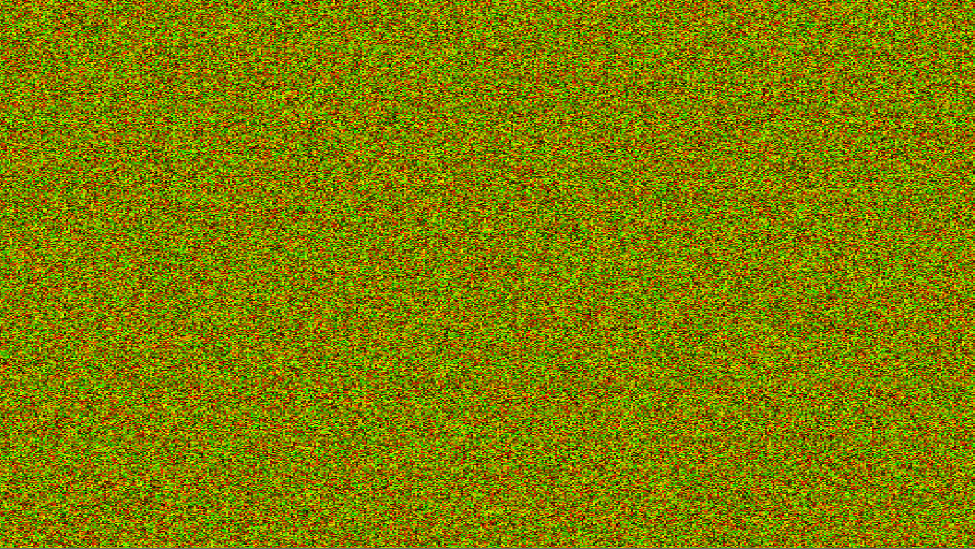
我们使用compute shader生成一张白噪声RT来达到随机的目的:
compute shader:
// Each #kernel tells which function to compile; you can have many kernels
#pragma kernel Generate_White_Noise


// The below macro is used to get a random number which varies across different generations.
#define rnd(seed, constant)  wang_rnd(seed +triple32(_session_rand_seed) * constant)


uint triple32(uint x)
{
     x ^= x >> 17;
     x *= 0xed5ad4bbU;
     x ^= x >> 11;
     x *= 0xac4c1b51U;
     x ^= x >> 15;
     x *= 0x31848babU;
     x ^= x >> 14;
     return x;
}

float wang_rnd(uint seed)
{
      uint rndint = triple32(seed);
      return ((float)rndint) / float(0xFFFFFFFF);  // 0xFFFFFFFF is max unsigned integer in hexa decimal
}

// Create a RenderTexture with enableRandomWrite flag and set it
// with cs.SetTexture
RWTexture2D<float4> _white_noise;
uint                _session_rand_seed;

#define image_dimension 512

[numthreads(8,8,1)] // 16 in 16 image.
void Generate_White_Noise(uint3 id : SV_DispatchThreadID)
{

     uint  pixel_unique_id     = id.x + id.y * image_dimension;
     float rand_x              = rnd(pixel_unique_id, 1);
     float rand_y              = rnd(pixel_unique_id, 861);
           _white_noise[id.xy] = float4(rand_x, rand_y, 0.0, 0.0);

}
我们每隔一段时间就改变一次随机数种子来输出变化的白噪声贴图:
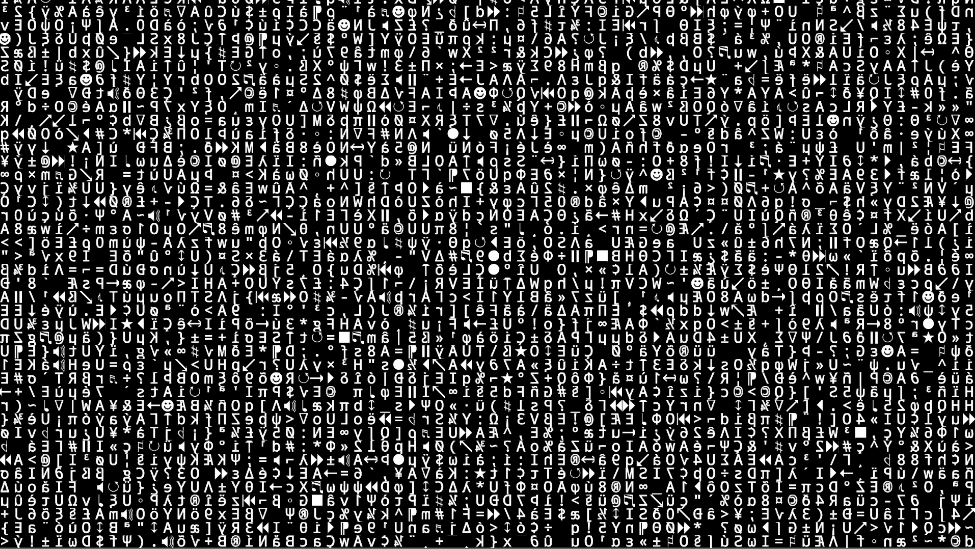
随后我们在绘制屏幕时使用白噪声贴图来采样我们的文本贴图:
Shader "Unlit/ScreenSpaceMatrixEffect"
{
    SubShader
    {
        Tags { "RenderType"="Opaque" }
        LOD 100

        Pass
        {
            CGPROGRAM
            #pragma vertex vert
            #pragma fragment frag

            #include "UnityCG.cginc"

            struct appdata
            {
                float4 vertex : POSITION;
                float2 uv     : TEXCOORD0;
            };

            struct v2f
            {
                    float2 uv     : TEXCOORD0;
                    float4 vertex : SV_POSITION;
            };

            uint      _screen_width;
            uint      _screen_height;

            sampler2D _white_noise;
            sampler2D _font_texture;

            v2f vert (appdata v)
            {
                v2f o;
                o.vertex = UnityObjectToClipPos(v.vertex);
                o.uv     = v.uv;

                return o;
            }

            float text(float2 coord)
            {
                float2 uv    = frac (coord.xy/ 16.);  // 获取当前block的uv
                float2 block = floor(coord.xy/ 16.);  // 获取当前block的ID. 左下角是(0,0),右上角是(15,15)
                uv = uv * 0.7 + .1;  // 做点缩放让字符更大

                float2 rand  = tex2D(_white_noise,    // 从变化的白噪声贴图中获取随机值
                block.xy/float2(512.,512.)).xy;       // 512 是白噪声贴图的宽度. 除以宽度让每个block对应噪声贴图的一个像素

                rand  = floor(rand*16.);              // 每个随机值被用于在16列的font_texture中采样
                uv   += rand;   // 让uv做随机偏移

                uv   *= 0.0625;   // 将uv从0-16. 映射成0到1,以便从font_texture中采样
                uv.x  = -uv.x;
                return tex2D(_font_texture, uv).r;
            }

#define scale 0.6
            fixed4 frag (v2f i) : SV_Target
            {
                fixed4 col = float4(0.,0.,0.,1.);
                col.xyz = text(i.uv * float2(_screen_width, _screen_height)*scale);
                return col;
            }
            ENDCG
        }
    }
}
最后得到文本随机变化的效果:
下雨的矩形列
float3 rain(float2 fragCoord)
{
    fragCoord.x  = floor(fragCoord.x/ 16.);  // 得到列号
    float offset = sin (fragCoord.x*15.);    // 每一列雨柱需要有不同的起点,对列号取sin值作为偏移
    float speed  = cos (fragCoord.x*3.)*.15 + .35; // 列号取cos值得到不同的速度.加上0.35保证是正数
    float y      = frac((fragCoord.y / _screen_height)  // 这一行让y映射成0到1
                        + _Time.y * speed + offset);    // 给y加上不同的速度和偏移

    return float3(.1, 1., .35) / (y*20.);               // y值越大越暗
}

#define scale 0.6
fixed4 frag (v2f i) : SV_Target
{
    fixed4 col     = float4(0.,0.,0.,1.);
    col.xyz = rain(i.uv * float2(_screen_width, _screen_height)*scale);
    return col;
}
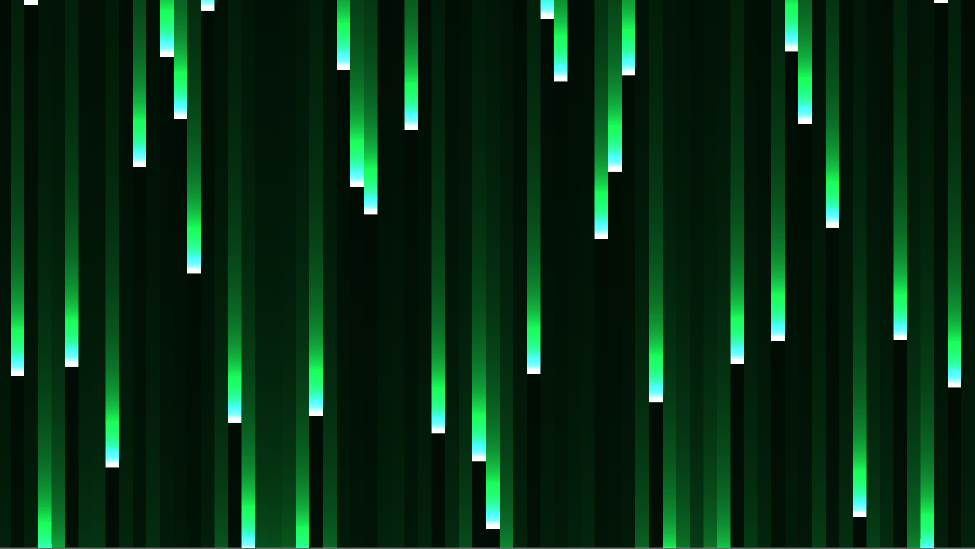
雨的效果比较简单,就是自上而下颜色越来越亮,再水平分列,给每一列不同的偏移和速度就行了。这是只有雨柱的效果:
最后我们把文本变化和雨柱效果相乘,就是2D的数字雨效果了。
fixed4 frag (v2f i) : SV_Target
{
    fixed4 col     = float4(0.,0.,0.,1.);
    col.xyz = text(i.uv * float2(_screen_width, _screen_height)*scale)*rain(i.uv * float2(_screen_width, _screen_height)*scale);
    return col;
}
应用到场景中
我们如何让数字雨沿着场景模型流动呢?这里需要用到triplaner mapping三平面映射的技术。简单来说就是利用世界空间坐标在三个方向上采样纹理,最后通过法线计算权重混合结果。核心代码如下:
fixed4 frag (v2f i) : SV_Target
{
    fixed4 col      = float4(0.,0.,0.,1.);
    float3 colFront = MatrixEffect(i.worldPos.xy + sin(i.worldPos.zz));
    float3 colSide  = MatrixEffect(i.worldPos.zy + sin(i.worldPos.xx));
    float3 colTop   = MatrixEffect(i.worldPos.xz + sin(i.worldPos.yy));

    float3 blendWeight  = pow(normalize(abs(i.normal)), sharpness);
        blendWeight /= (blendWeight.x+ blendWeight.y+ blendWeight.z);
        col.xyz      = colFront * blendWeight.z +
                        colSide  * blendWeight.x +
                        colTop   * blendWeight.y;

    float distance_to_center = distance(i.worldPos.xyz, _Global_Effect_center.xyz);
    float control_value      = saturate(_Global_Transition_value);
    if (control_value * 60.0f < distance_to_center) col = col * 0.0f;

    float2 screenPos = i.screenPos.xy / i.screenPos.w;
        col      *= split_from_midle(screenPos.x, _Global_Transition_value, 0.0f);
        col       = min(1.5,col);
    return col;
}
资源
完整的项目地址在这里:
https://github.com/IRCSS/MatrixVFX
大家可以下载玩玩。其中用到的3D模型由于github的lfs的流量原因,可能下载不了,可以在sketchfab上下载obj文件: https://skfb.ly/6UoNJ
注意美术资源采用CC Attribution-NonCommercial协议请勿商用。
原作者的灵感来自于shadertoy的这个案例:https://www.shadertoy.com/view/ldccW4
原作者的博文还列出了一些三平面映射技术的文章,可以一读:
https://catlikecoding.com/unity/tutorials/advanced-rendering/triplanar-mapping/
https://medium.com/@bgolus/normal-mapping-for-a-triplanar-shader-10bf39dca05a
https://www.ronja-tutorials.com/2018/05/11/triplanar-mapping.html
如果你喜欢这个系列可以扫描下面的二维码关注我的公众号: